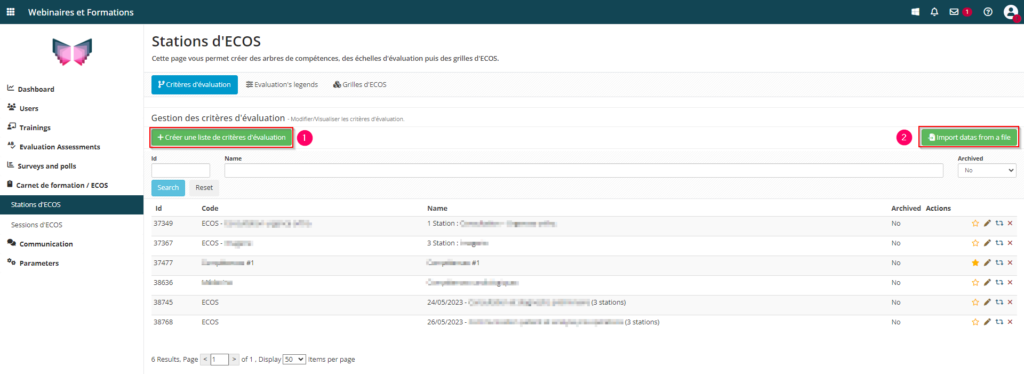
You can create skills trees on the THEIA platform. These can then be used to :
- link questions or issues in an exam to items in a skills tree
- create skilltree sessions, i.e. create a grid-based assessment in a real situation (by associating a skilltree with one or more assessment scales).
In this tutorial we will look at how to create a skilltree in THEIA.
There are two ways of creating a skills tree:
- 1: Manually create the skills tree directly on the platform
- 2: Import a tree from an Excel file (with the option of uploading the file template to the platform).

1. Manual creation on the platform
Once you have clicked on “Créer une liste de critères d’évaluations”, you will be taken to the page opposite, where you can configure the base of your tree.
- 1: The code allows you to give a short title to your tree, so that it can appear easily if the name is long.
- 2: The name corresponds to the full name of your tree (which can be longer than the code)
- 3: You can add a description to provide more information
- 4: If this tree is to be linked to exam content, you can tick this box if this level is to be linked to questions or files (if it is to be used in a skills repository session, this is not necessary).

Once you’ve created the basis for your tree, you’re in your tree. You can go to the “Content” tab to add your tree structure and all the items it should contain.

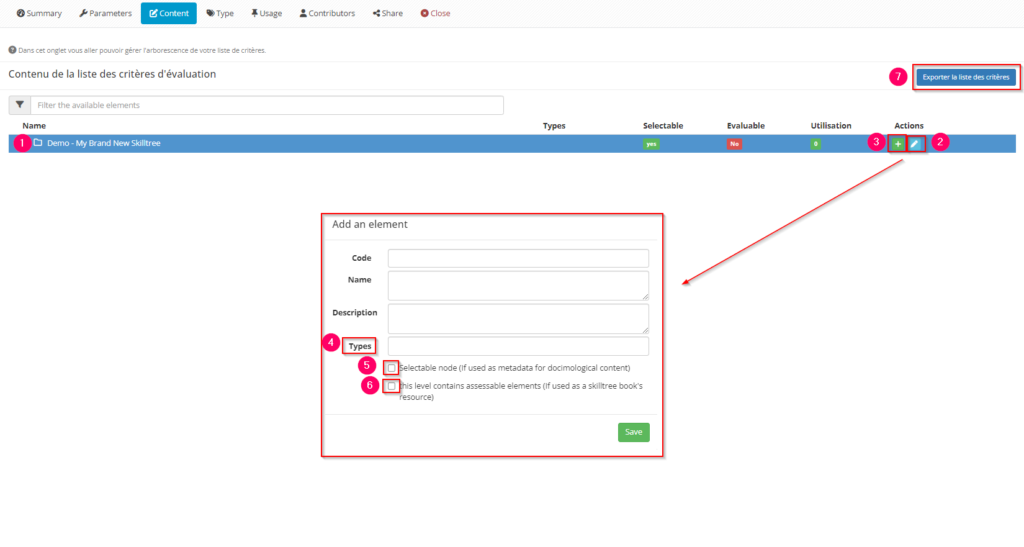
- 1: This line corresponds to the base of your tree (with the code “Demo” and the name “My Brand New Skilltree”).
- 2: You can change this information by clicking on the pencil at the end of the line
- 3: Click on the green “+” to add items to your tree. This will open the “Add an item” window.
4: If you have entered skill types (“Type” tab to the right of the “Content” tab) you can identify skill items by type (useful if the tree is used as metadata in an exam, this will generate exam marks by skill type). - 5: This box should be ticked if your tree will be used in an exam and if this level should be selectable
- 6: This box should be ticked if your tree will be used in a skills repository session (this means that this level can then be filled with assessable items).
- 7: You can export the contents of your tree by clicking on “Export tree”.

Here’s an example of a skills tree.
Finally, you need to define how you are going to use your tree. To do this, you can :
- 1: Go to the “Usage” tab
- 2: Select “Metadata” if this tree is going to be linked to exam questions or files.
- 3: Select “Resources” if this tree is going to be used to create a skills repository that will be used in a skills repository session.

2. Creation by importing an Excel file
To import a tree from an Excel file, go back to the main page and click on “Import data from a file”. You will then be taken to the page allowing you to “Download the file template”.

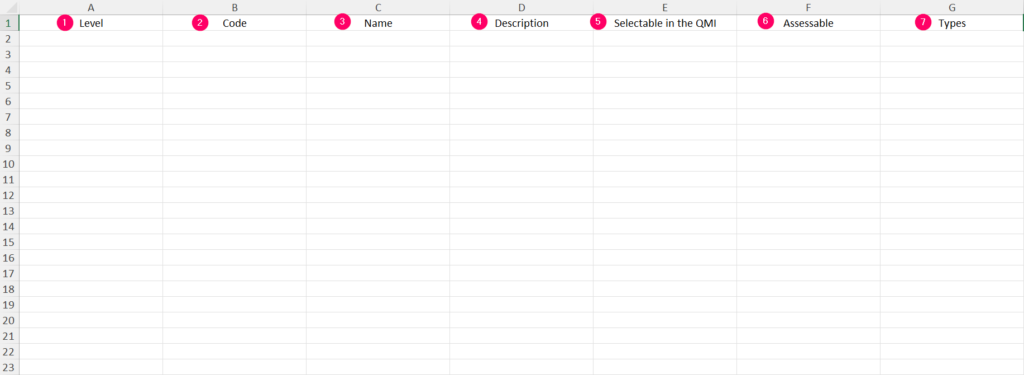
The pattern has 7 columns to fill in:

- 1 : The “level” is used to create the tree structure (0-1-2…)
- 2 : The code
- 3 : The item name
- 4 : A description (optional)
- 5 : Selectable in the QMI (0 for no and 1 for yes) if used as metadata in an examination
- 6: Assessable (0 for no and 1 for yes) if the tree is used in a skills repository session and the item is assessable
- 7 : The type of skills can be entered if the tree is used as metadata in an exam, otherwise the column can remain empty
Voici un exemple d’un fichier rempli, d’un arbre qui a vocation a être utilisé en tant que métadonnée dans un examen :


Une fois le fichier rempli il vous suffit de cliquer sur “Choisir un fichier” (1) et ensuite “Consolider le fichier et importer” (2).
If you want to find out more, take a look at the tutorial below: “What can items in a skills tree be linked to?


