A training session is the organisation of educational activities and resources for a given period, aimed at a group of learners.
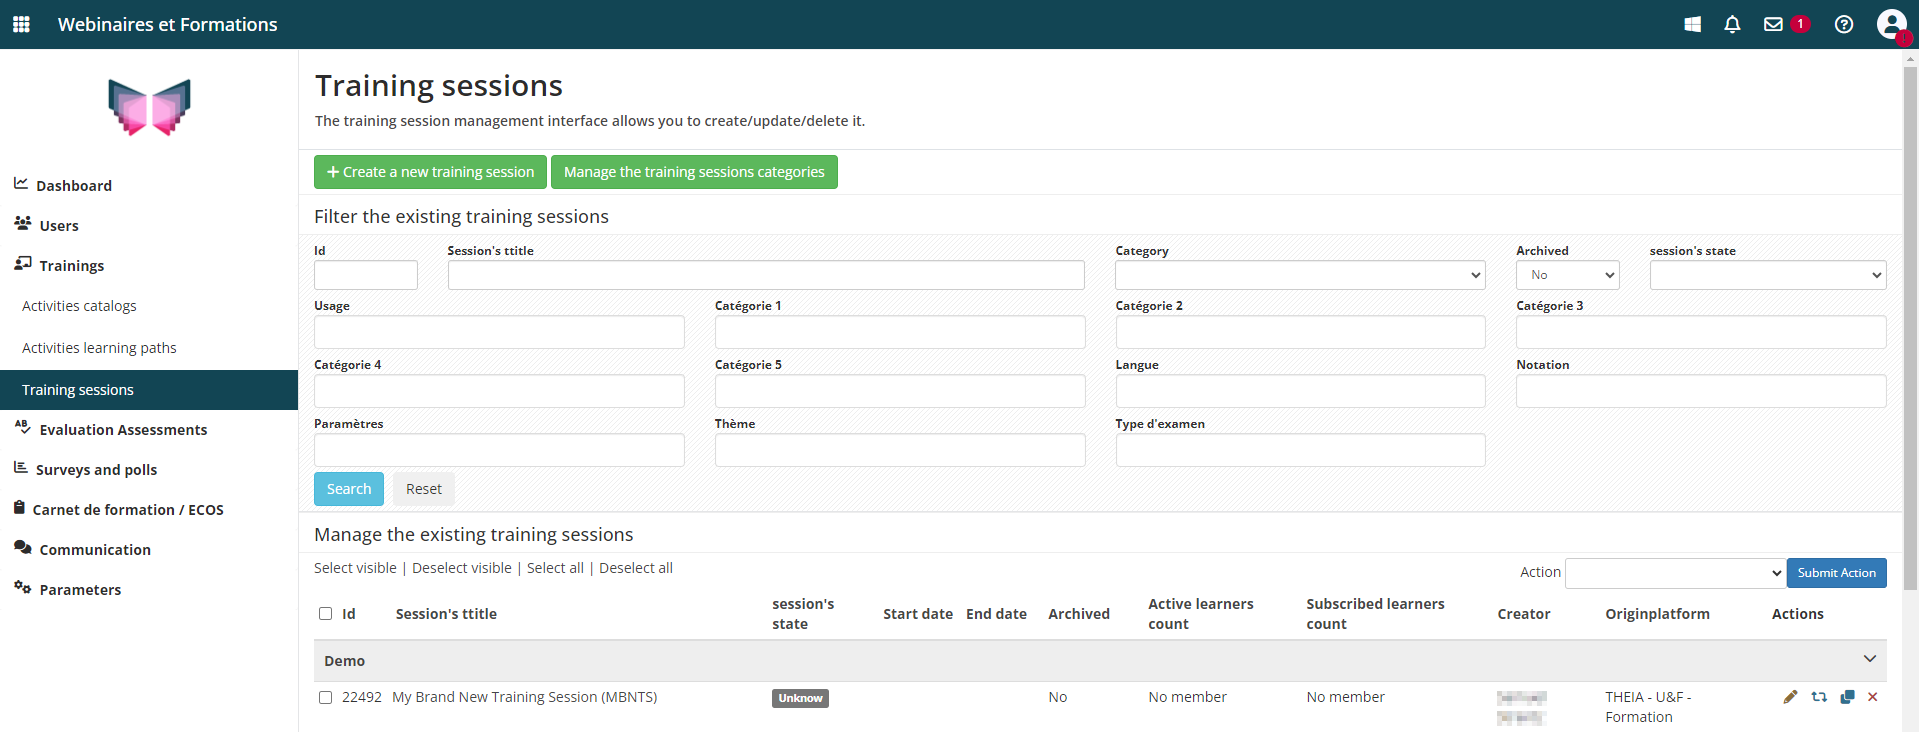
In the “Trainings” > “Training sessions” menu, you can manage the list of training sessions and categories, and create new ones using the “Create a new training session” button. The session configuration window then presents a number of tabs, particularly those relating to settings.
1. Setting up a training session
1.1 Training session parameters
In a training session, the Parameters tab is used for configuration.

The general parameters of the session are :
- Session name.
- Category: This option is optional. The aim, for the manager, is to classify the sessions.
- Start date (and time): Date from which learners registered for the session can access it via their learner interface.
- End date (and time): Date until which learners registered for the session can access via their learner interface.
- Archived: Indicates whether the session is archived or not. If it is archived, it will no longer appear in the management interface by default, but will still be visible to learners.

Advanced functions for a training session include :
- Authorising read-only access after the session end date: Learners can continue to consult all or some of the activities in read-only mode (either for all the activities in the session, or for those configured in the schedule, even if the session is archived).
- Allow activity creators to define themselves as responsible for their activities: This means that participants who create activities can also monitor them as activity managers (in the dedicated activity manager interface).
- Enable management of training objectives (conditional): This enables you to manage conditional paths based on objectives to be achieved.
- Activate notifications: Learners receive alerts via the “notifications” tool as soon as a resource is added to the session, and also the day before the start of the session, during the session according to its duration and 2 days before it ends.

The learner display settings allow you to select the tabs that learners will have access to in their interface:
- Display the “Training plan” tab: This displays the training plan and provides access to the various training activities.
- Show the ” Training objectives ” tab: This is only relevant in the case of conditional courses based on training objectives. It provides individual monitoring of the learning objectives and their completion status.
- Display the ” Agenda ” tab: This displays a agenda in which the different activities of the training session are positioned (this can be useful when activities are planned in a specific way).
- Default tab: This determines which tab will be displayed to learners when the session opens.
- Fold the training plan into the display: In the case of activity-rich sessions, a condensed display of the plan (which only takes in the first level of the module architecture).
- Miniature session image (visible to learners): This customises the display of the session in the list of available sessions.
1.2 Display parameters for a training session (Learner interface)
The name of the session, the start and end dates and the image are displayed to the learner.

The “Information” tab can be edited via the “Welcome message” tab in the training session. It can be used to display an overall message to learners, as well as various items of information as the session progresses.

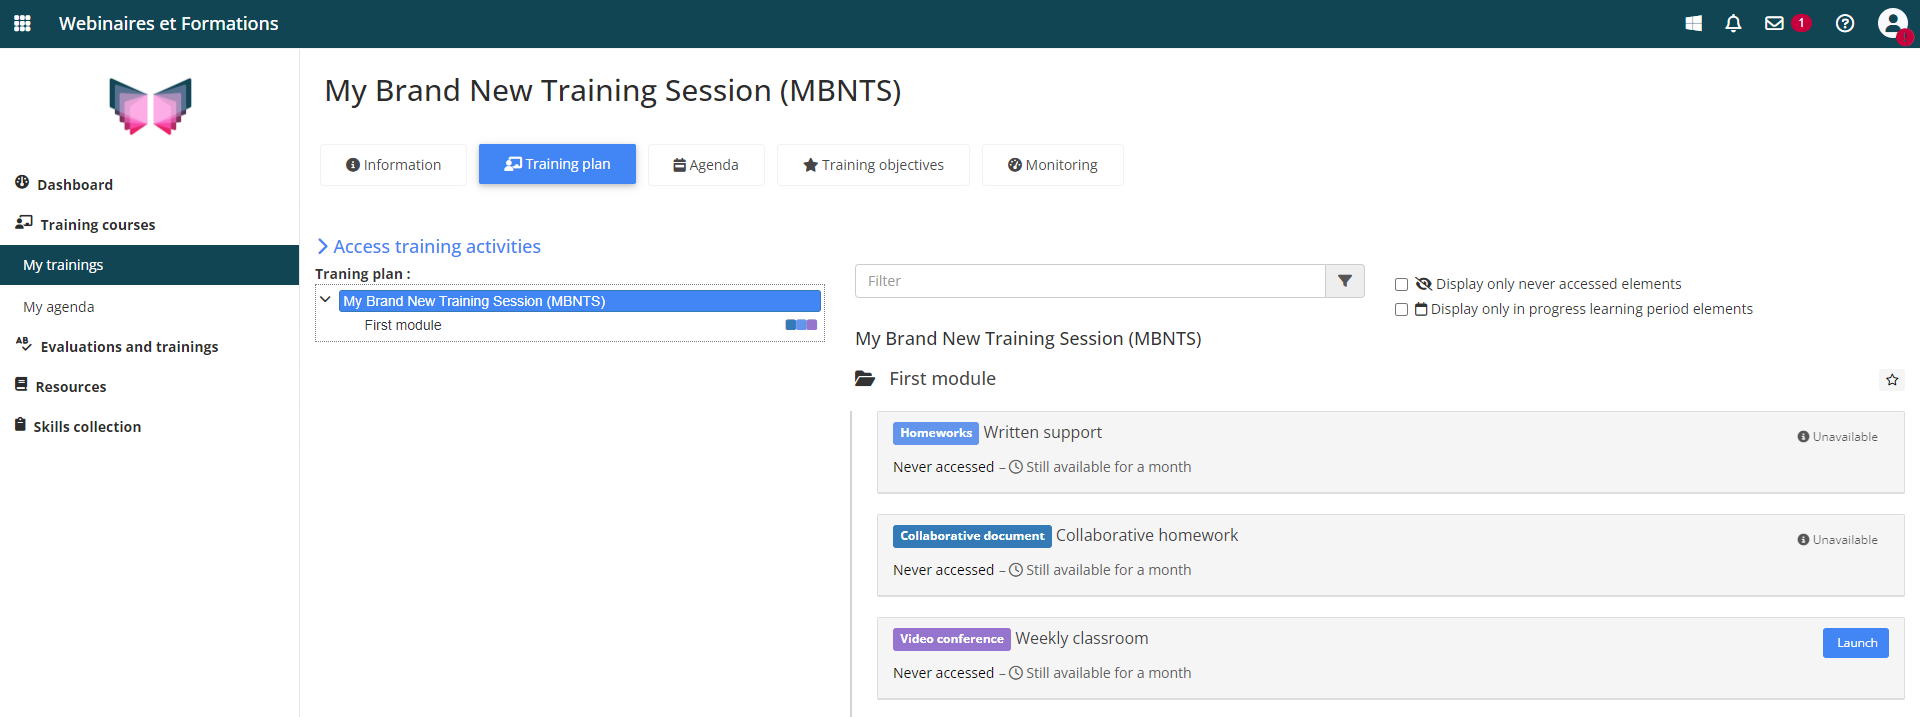
The “Training plan” gives access to the session activities. It can be configured via the session’s “Program” tab.
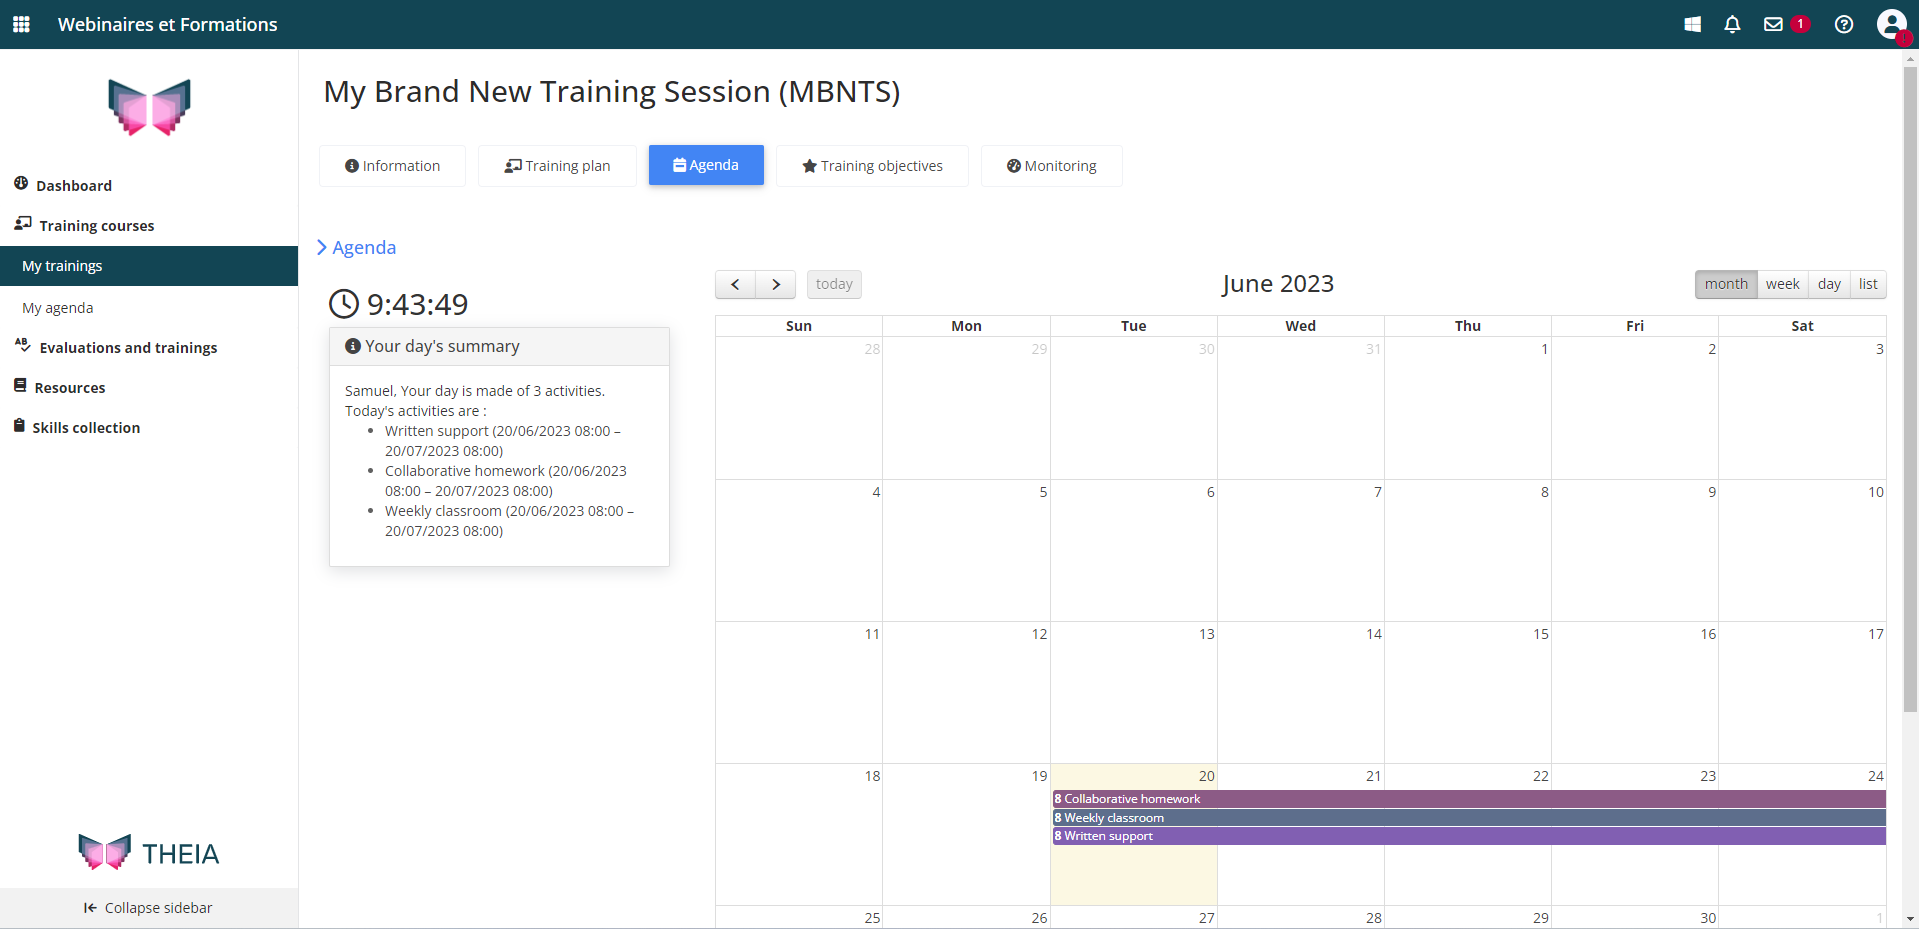
“Agenda” shows the activities that have been specifically planned via the “Planning” tab.
In this example, the three activities start on Wednesday 20 June and run for the whole week.
If training objectives are enabled, the “Training objectives” tab allows learners to view the conditions and status of each objective.
In this example, we can see that the first objective has not yet been validated, and will only be validated once the learner has accessed the “collaborative document” activity at least once.

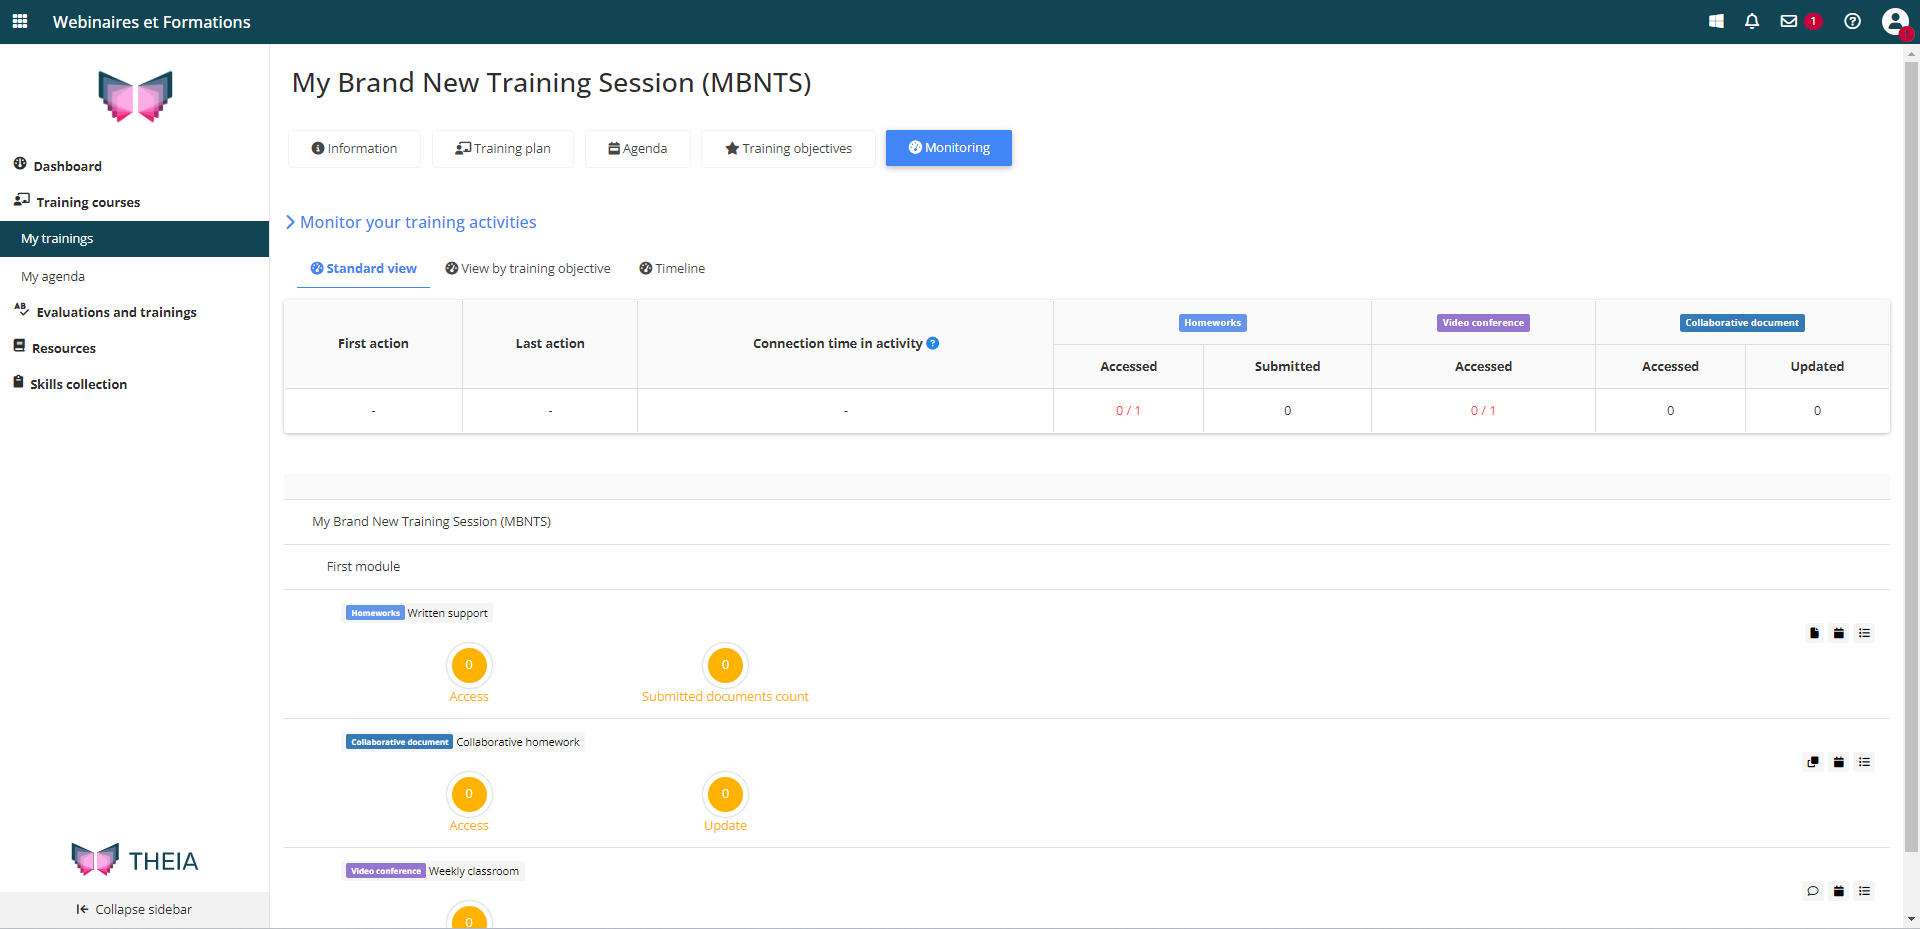
The ” Monitoring ” tab provides detailed, individual monitoring for each activity in the training session. It is activated by default and cannot be configured.
2. Subscribe learners
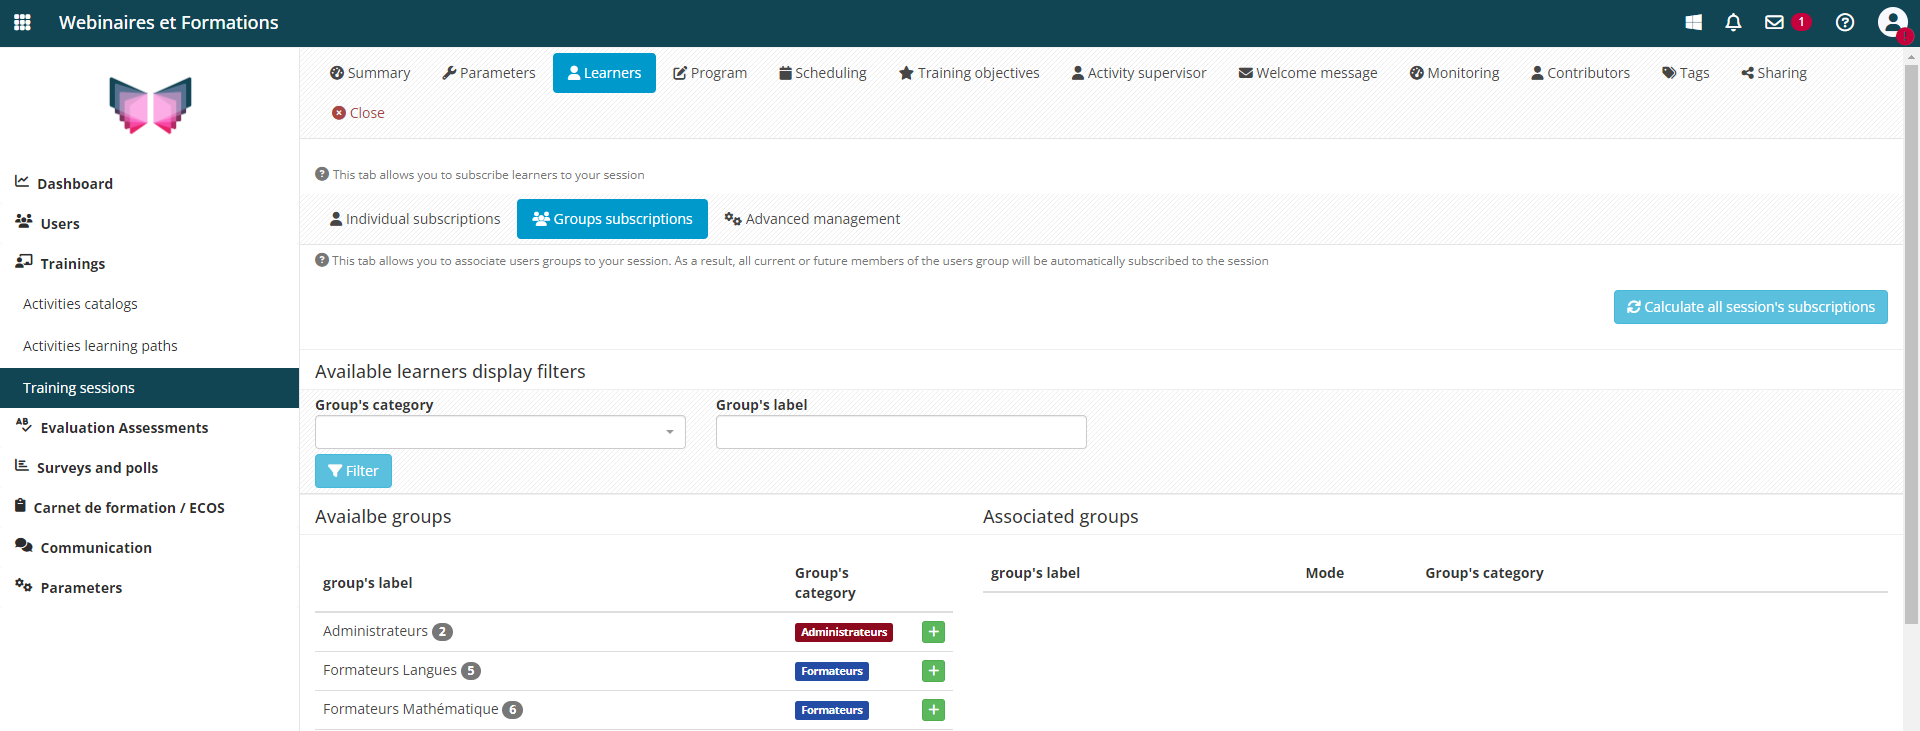
2.1 Group subscriptions
The “Learners” tab is used to subscribe participants.
It is advisable to subscribe to the group(s) to which the learners belong via the “Group subscriptions” tab.
This method automatically enrols or de-enrols users who are added to or removed from the group during the session.
2.2 Individual subscriptions
To view the list of subscribed learners and add individual learners, go to the “Individual subscriptions” tab.

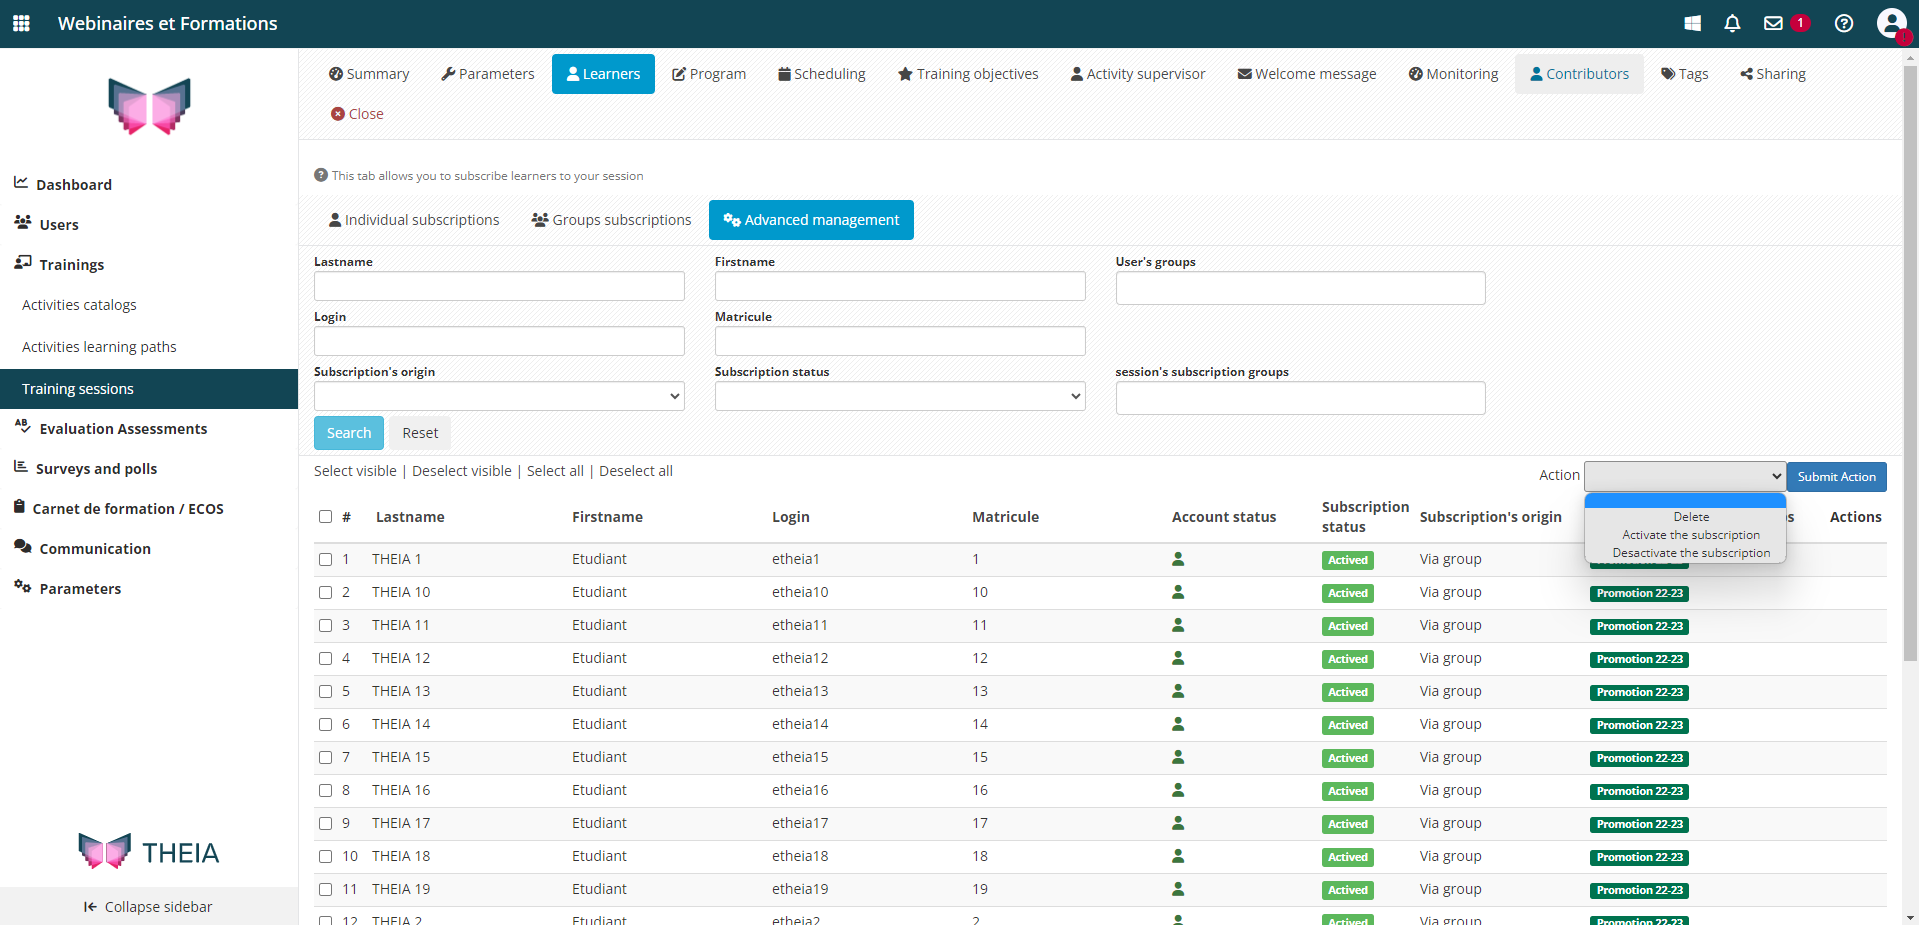
2.2 Advanced management
“Advanced management” allows :
- display the list of learners subscribed to the session
- Activate/deactivate/delete subscriptions by selecting one or more learners
- Export the list of subscribed learners in Excel format
3. Define the content of my training session
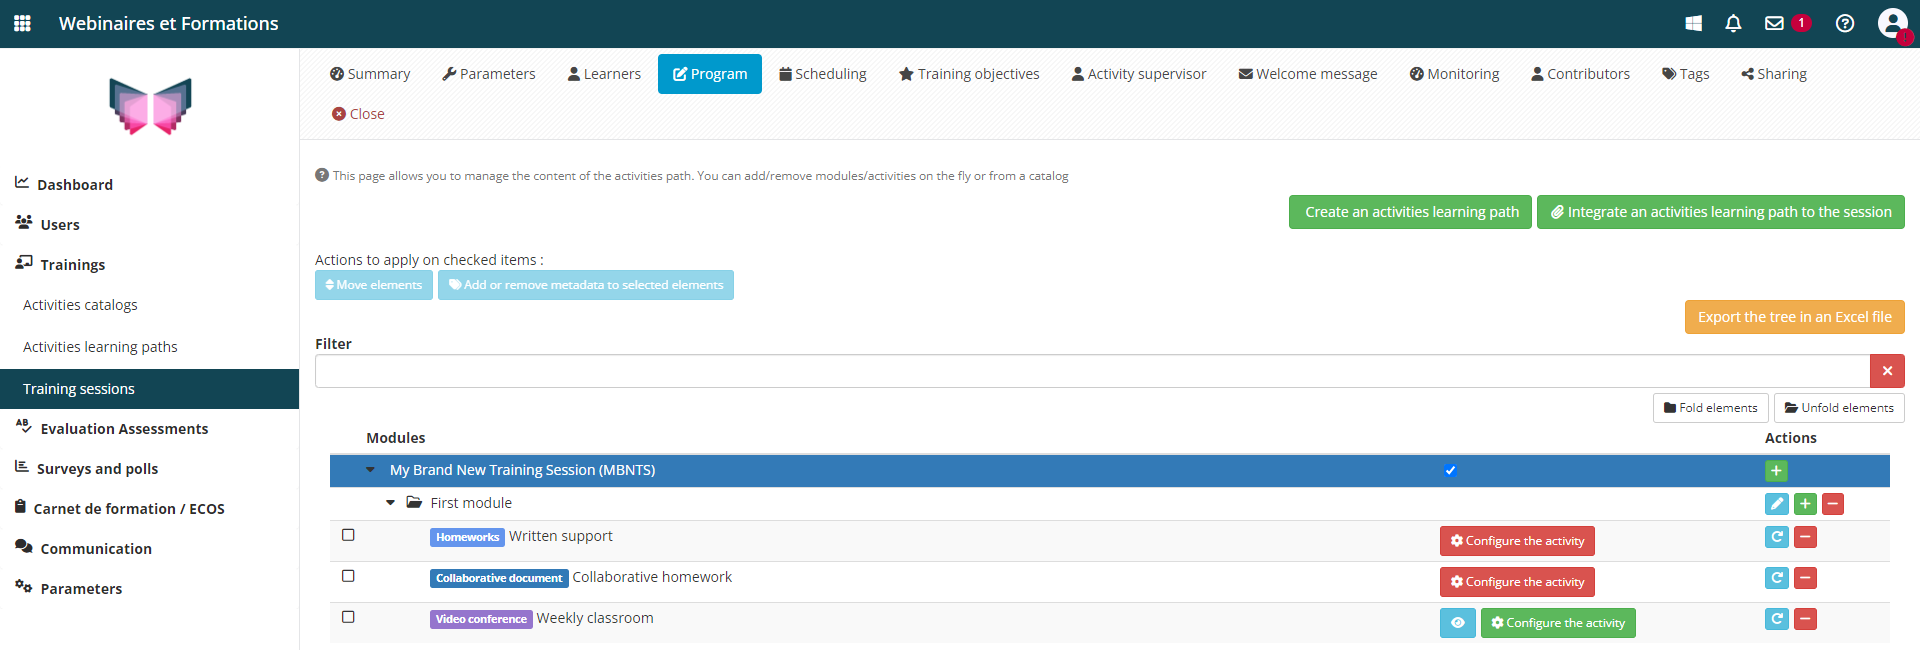
In the ” Program ” tab, you can add, delete, rename and order the content.
The “Add to catalog base” button is used to create the Catalog Theme folder. The “+” icon creates a Sequence folder in which the following activities can be configured: Self-assessment / Certification / Chat / Course / Collaborative document / Survey / Exam / Forum / External link / In person lesson / Skilltree book / Scorm / Assignments / Video conference.
Once the activity has been configured, the “Eye” icon displays the element as a learner would see it in a training session.
The “Drag & Drop” command can be used to reorganise the learning sequence.
An activity path can also be added or created using the “Create an activities learning path” and “Integrate an activities learning path to the session” buttons.
4. Scheduling activities
The ” Scheduling ” tab is used to define the access period for students for each of the activities in the training session. By default, all activities are scheduled according to the session start and end dates, but it is possible to customise these access dates.
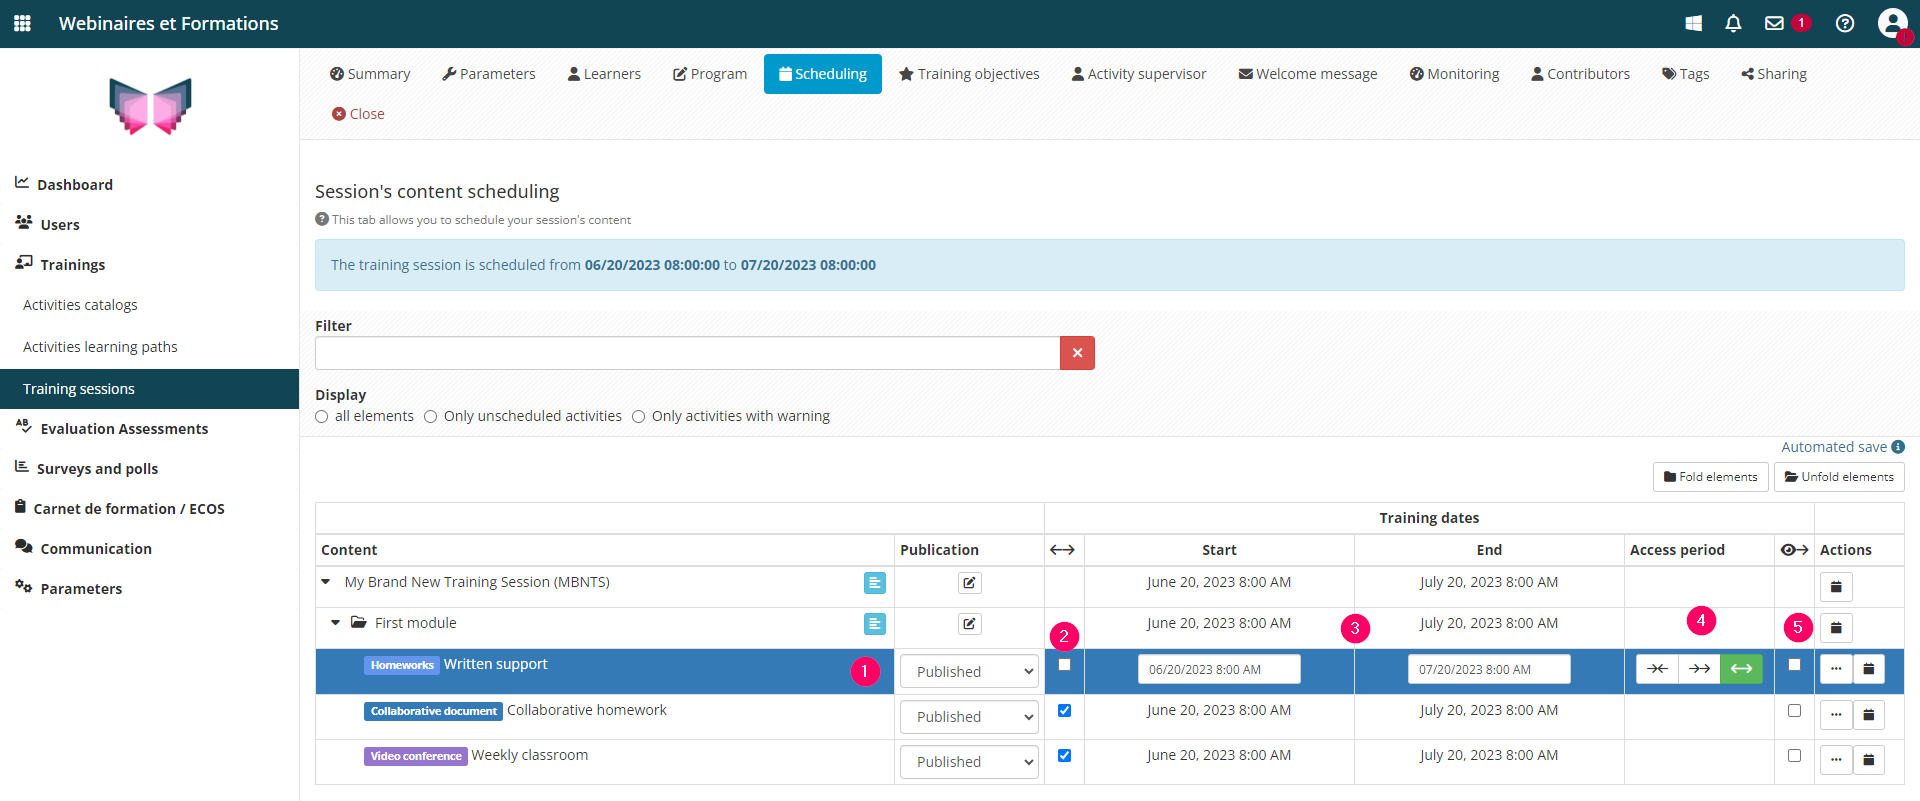
- 1: The user can change the publication status of an activity (by default “Published” means that the activity will be visible and accessible within the defined period, “Unpublished”: the activity will not be visible, “Unavailable”: the activity will be visible but not accessible).
- 2: To customise the access dates for an activity, uncheck this box. If you tick it again, the activity will use the dates set for the session.
- 3: Identification of the start and end dates and times of the activity, which will be displayed in the learner interface.
- 4: The access period can be strictly restricted according to the dates, but you can also allow access beyond them (the dates are then indicative and are used to plan the activities over time).
- 5: If this box is ticked, this allows consultation access after the access dates.
5. Involving activity supervisors
For each activity in the training session, using the “Activity supervisors” tab, the user can assign one or more activity supervisors to monitor or lead the activity via the Activity supervisor interface.
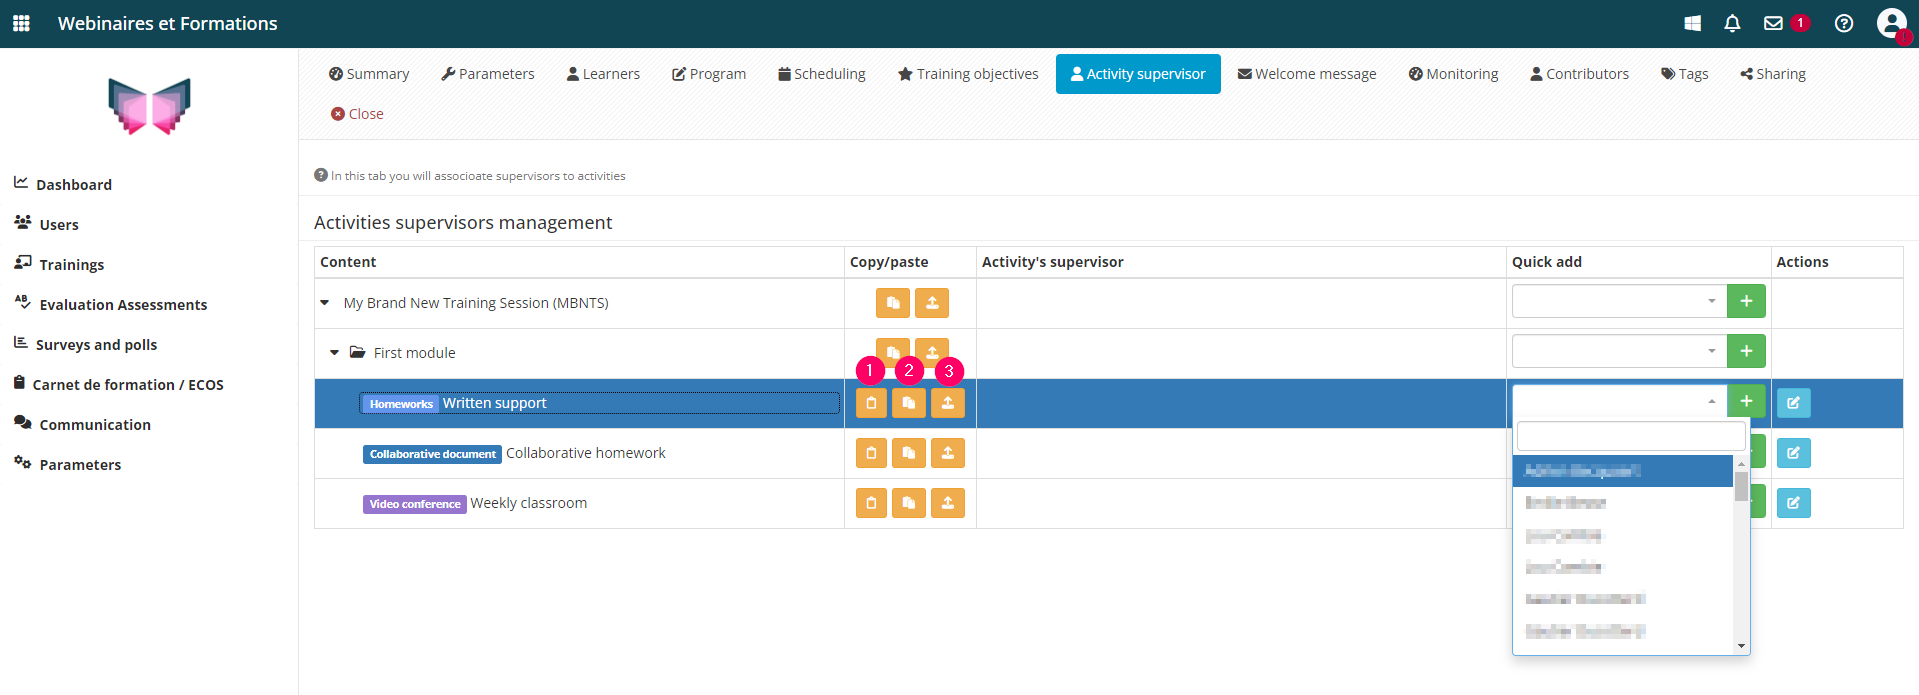
When several activity managers are in charge of several activities, it is possible to copy/paste these supervisors directly (at the level of an activity, but also at the level of an activity folder):
- 1: Copies the list of activity supervisors.
- 2: Pastes the copied supervisors into the target activity.
- 3: Replaces the supervisors in the target activity with the copied supervisors.
If you want to find out more, take a look at the tutorial below: “Tracking the progress of my learners during their training session”


