Do you have an exam with open questions? In this tutorial you’ll find everything you need to know about allocating papers to correctors.
1. Setting the correction
1.1 Configuring the correction
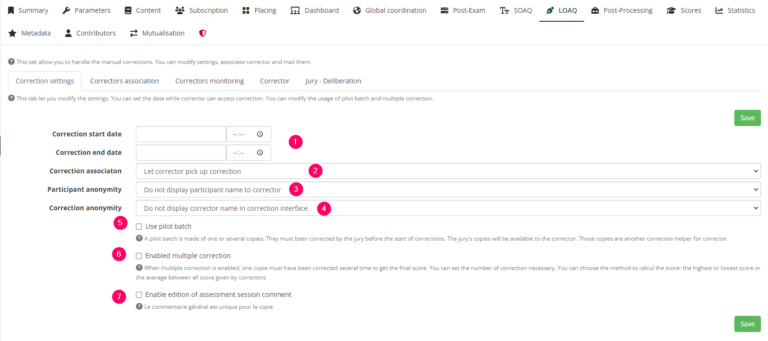
You can start by configuring the marking of your open-ended questions (Essay), here several parameters can be used:
- 1: you can set a start and end date to limit marking over time (if you leave the date blank, markers are free to mark whenever they like)
- 2: allow markers to mark as many papers as they wish (useful if there is only one corrector per exam or per question), or manually associate marks (i.e. you allocate a certain number of papers to each marker)
- 3: whether or not to make learners’ names anonymous on the papers and in the marking interface
- 4: whether or not to make the correctors’ names anonymous in the marking interface
- 5: give correctors one or more examples of marking to refer to
- 6: Activate multiple marking, i.e. each copy should be marked a given number of times (with the option of choosing the best mark, the lowest mark or the average).
- 7: Activate a general commentary on the paper, which you can make visible or not on the learner side (you can also choose which markers you wish to give the option of editing this commentary).

1.2. Assigning correctors
Once the configuration is complete, you can designate the correctors for each open question. In the example below, you can assign one or more correctors to all 2 open questions. To do this, simply click on the first drop-down menu (1), find the correctors using their first and last names, select them and click on the green + to add them. If the correctors are to be different for each question, you need to assign markers to each question, doing the same for the first question (2).

1.3. Allocating copies
You now know who should mark which question and when.
If you have opted for the following setting: “Correctors are free to choose their own correction “, your work is finished and all you have to do is wait for the correctors to come and correct their papers. You will be able to follow their progress in the “Correction follow-up” tab.
Alternatively, if you have opted for manual association of correctors, you can now assign the papers to the correctors. There are several possible scenarios. Here are a few examples:
1. The correctors mark all the questions in the exam and I want to divide the papers fairly between them.

In the example opposite, I have 2 correctors who have been assigned to the 2 open questions in my exam, and I want to divide the papers equally between them. To do this, I select the 2 correctors > I click on “Assign corrections” > “Use all participants” > “Association by copy” > “Do not set a limit” > “Confirm”. This will have the effect of distributing the 49 copies equally between the 2 markers. 49 being an odd number, one marker will have 25 copies while the other will have 24.
2. The correctors correct different questions and I want to distribute the number of questions corrected fairly between each corrector.
Here, correctors 1 and 2 will correct only the first question and correctors 3 and 4 will correct the second question (each having been assigned to the question that concerns them). If I want everyone to mark the same number of questions, I can select all 4 correctors> Click on “Assign correctors” > “Use all participants” > “Association by answer” > “Do not set a limit” > “Confirm”. Given that there are 49 papers with 2 open questions, each corrector will have between 24 and 25 questions to mark (in the example opposite we can see that corrector 1 will mark 25 question 1s while corrector 3 will mark 25 question 2s).

3. The correctors correct all the questions in the exam, but they only have to correct the papers of a certain group of learners.

In the example opposite, I have 2 correctors who have been assigned to the 2 open questions in my exam, and I want each corrector to correct the papers of a certain group of learners. I can therefore select the first corrector > click on “Assign corrections” > “Filter participants” > select the participants manually or search by group to select an entire group > “Use selected participants” > “Association by copy” > “Do not set a limit” > “Confirm”. I can then do the same for the second marker. Here I have assigned 20 copies to marker 1 and 29 to corrector 2.
2. Monitoring corrections
Once your correctors have been assigned, you can track their progress in the “Association/Corrections tracking” tab.
- 1: here you can see that the markers have both been assigned to 2 questions in the exam
- 2: all the papers and questions have been assigned.
- 3: the correctors have 25 and 24 papers to correct respectively
- 4: they each have 50 and 48 questions to mark (as there are 2 questions per paper)
- 5: You can send them a group email or send a reminder to all the correctors who have not finished their correction.
- 6: or you can send an individual email to each marker
- 7: Finally, you can delete the markers’ corrections (by choosing to delete all the corrections or just the corrections that have not yet been marked).

If you want to find out more, have a look at the tutorial below: “Correcting answers to Short answers questions”.


